Enzyme Linked Immunosorbent Assay (ELISA) is an immuno-assay. It is based on the principle of interaction of antigen-antibody to detect and quantify an antigen of interest. The step of ELISA are generally coating, blocking, sample incubation, incubation with primary and secondary antibody, development and finally reading the assay results. Absence and presence of these steps depends on the type of assay you are developing. The most effective way to develop an assay is by using design of experiment (DOE, is not discussed in this article). Following is the general procedure for developing an ELISA assay.
Coating
It depends on the type of ELISA assay you are trying to develop. Coating is done on high binding plate. High biding plates are available from different brands/vendors (Thermo Fischer, VWR, Millipore Sigma, etc.) in the market. If you are developing a direct or indirect ELISA, you will need to coat the antigen of interest (or sample) directly on the plate. The concentration of antigen concentration depends on the nature of the antigen that you are trying to quantify. You can coat a range of antigen to generate a standard curve. An ELISA pate can be coated at 2-8° C overnight or 1.5-2 hours at 37° C or 25° C depending on your assay. Similarly, if you are developing sandwich ELISA, you need to coat the antibody specific to your antigen of interest. Generally, monoclonal antibodies are preferred over polyclonal as a capture antibody to have more specific response and low background noise. Mostly, it is preferred to wash the capture antibody or antigen coated plate. However, in some cases where sample is pure antigen, the washing step can be skipped.
Blocking
Blocking is done to occupy all remaining surfaces of plate that are not adsorbed by coating antigen or antibody. Blocking solutions are protein or mixture of proteins solution that are not related to the antigen of interest. Once the plate is coated, wash the coated wells upto 3 times with wash buffer (200-300 µL/well) and tap the plate on dry paper towel to discard any excess wash buffer. The wash buffer can be 0.05% – 0.1% tween-20 in 1X PBS (PBST). A 200 µL of blocking solution is usually added to each well. Perform the plate washing step after every incubation to minimize the background noise. ELISA plate is incubated from 30 minutes to 1 hour. Incubation can be done at ambient temperature (25° C) or at 37° C. Generally, blocking solutions are 1% casein in 1XPBS or 0.05% -0.1% BSA (bovine serum albumin). You can also purchase the readymade 1% casein blocker from vendor. After blocking, the plate is washed 3-4 times with 200-300 µL/well of wash buffer.
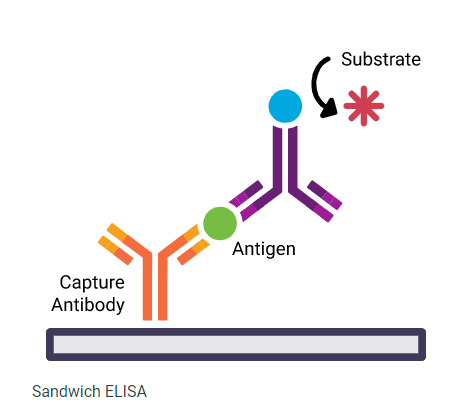
Figure: A representative image of Sandwich ELISA (Source: www.licor.com)
Sample Incubation
If you’re developing an indirect or direct ELISA, you do not need to perform this step as you’ve already applied (coated) your sample (antigen) to the plate. This step applies to Sandwich ELISA. The sample can be tissue lysate or pure antigen of interest diluted in1X PBS (usually) or cell supernatant. The sample is incubated for 1-2 hours depending on the type of antigen that you’re trying to detect. Incubate the plate at ambient temperature (25° C) or at 37° C with or without shaking depending on your assay.
Incubation with Detection/Primary Antibody
The detection antibody is usually polyclonal. Use the vendor recommended dilution of detection antibody for detection. Dilute the detection antibody either in blocking buffer or wash buffer or in 1X PBS. Discard the sample and wash each well with wash buffer upto 3-5 times. Add 100 µL of diluted antibody per well and seal the plate with plastic wrap to prevent evaporation. Incubate the plate at ambient temperature (25° C) or at 37° C with or without shaking depending on your assay.
You can use the enzyme labelled detection or biotin labelled or completely unlabeled primary antibody. The enzymes are mostly horse radish peroxidase (HRP) or alkaline phosphatase (ALP). If you’re using biotin labelled detection antibody, you have to use streptavidin labelled enzyme as a secondary.
Incubation with Secondary Detection
This step applies when you use unlabeled primary antibody. The secondary detection antibody is used against primary detection antibody. For example, the primary antibody is mouse polyclonal, the secondary detection should be anti-mouse polyclonal. The secondary antibody could be either HRP or ALP labelled. If you have used biotin labelled primary, you should use streptavidin labelled HRP or ALP. You can optimize the concentration secondary antibody for your assay as it varies between assays. Like primary antibody, the secondary antibody should be diluted into the same diluent (example: blocking buffer or wash buffer or in 1X PBS).
Add 100 µL of diluted secondary antibody per well and seal the plate with plastic wrap to prevent evaporation. Incubate the plate at ambient temperature (25° C) or at 37° C.
Development
There are multiple ways of ELISA assay development; absorbance method, chemiluminescent or fluorescent method. Substrates are the specific to enzymes are tagged with your detection antibodies. The most commons substrate for HRP enzyme is 3,3′,5,5′-Tetramethylbenzidine (TMB) substrate for absorbance method. The most commons substrate for ALP enzyme is p-Nitrophenyl Phosphate (PNPP) substrate for absorbance method. Add 100 µL of develop substrate per well, seal the plate with plastic wrap and incubate at ambient temperature to develop the reaction. The development time varies between depending on the concentration of antigen of interest, antibody concentration, etc. After development, stop the reaction by adding 2N stop solution (2N sulfuric acid or 3N sodium hydroxide) per well, mixed well. Read the absorbance at 450 nm for HRP substrate and at 405 nm for ALP substrate.
References
ELISA Enzyme Substrates | Thermo Fisher Scientific – US
TMB Liquid Substrate System for ELISA suitable for ELISA Sigma (sigmaaldrich.com)
ELISA Enzyme Substrates | Thermo Fisher Scientific – US